Teaching the Phonemic Code in Reading Instruction: Effective Multisensory Activities & ‘Fun Sound Games’ to Directly Build Automatic Knowledge of the Complete Phonemic Code (Direct Print to Sound Instruction)
Free Multisensory Activities for Teachers and Parents to Help Students Learn the Direct Print to Sound Phonemic Code
Learning the Complete Direct Print to Sound Phonemic Code Essential for Developing Proficient Reading
To read, students need to learn the complete phonemic code, the specific print to sound relationships that are the basis for our written English Language. (Or for those who prefer technical terms, the grapheme (phonogram) = phoneme relationships.) To learn additional information and important background about the phonemic code see the article, The Building Blocks of Written English: The Phonemic Code Explained
Students must acquire automatic knowledge of the complete phonemic code so they can effortlessly convert print to sound and develop proficient reader phonologic processing pathways essential for reading success. While learning the phonemic code in isolation is not the end goal of reading instruction, knowledge of the phonemic code is an essential skill.
Parents and teachers should use effective multisensory activities to directly build automatic knowledge of the complete phonemic code in beginning reading instruction as well as in reading remediation when students are missing this essential skill. Direct instruction of the complete phonemic code is conducted as part of an effective direct systematic phonics program.
This article covers the direct actions parents and teachers can use to effectively teach their child or students the complete phonemic code. This includes, general information on effective instruction as well as specific highly effective multisensory activities to build knowledge of the phonemic code.
Direct Actions to build knowledge of the phonemic code: Effective Multisensory Activities to Directly Build Knowledge of Complete Phonemic Code ⇒ Print to Sound
The multisensory activities included on this page help the child or student acquire automatic knowledge of the direct print to sound (print=sound) relationship of the complete phonemic code. With direct instruction and repeated practice, the student can acquire automatic knowledge so they can effortlessly convert print to sound and develop proficient phonologic processing pathways. Learning the complete code is not an isolated skill, these effective multisensory activities for teaching the complete phonemic code should be conducted as a part of an effective direct systematic phonics program.
Key points/elements for effective instruction: General Information to Apply to All Activities Teaching the Phonemic Code
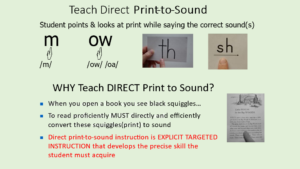
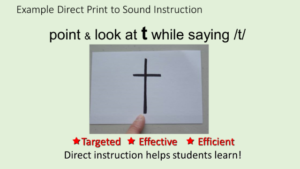
1) Explicitly teach the direct print to sound (print=sound) relationship. The student must look at the printed letter(s) and say the correct sound. This is direct black squiggle to correct sound. (grapheme to phoneme). Use direct print to sound instruction as it is direct, efficient and targeted to exactly the skill the student needs to read proficiently, convert print to sound!
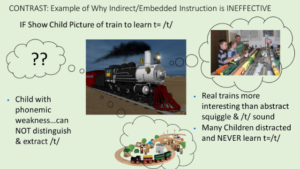
Always use effective and efficient direct print to sound instruction. Do not use ineffective indirect instruction methods such as picture =sound (picture of train and child has to determine ‘train’ starts with sound /t/ so letter ‘t’ must be /t/) or object = sound (or learn object sun = letter ‘s’ and child has to recall sun starts with /s/ and then to use the /s/ sound).
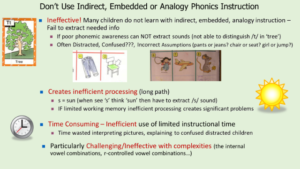
The following illustrations compare effective direct print to sound to the ineffective and inefficient indirect, embedded instruction approaches.
2) Make sure the child or student is actually looking at the printed letter(s) while saying the sound out loud. This is critical. The student will not create the necessary print to sound pathways unless they have direct eye contact with the printed letter(s) while saying the sound. If the child is chanting the sound while looking up at the ceiling or out the window, it will not create necessary print to sound (print=sound) link. If the child looks at the print but doesn’t say/hear the correct sound, it also will fail to create this necessary print to sound phonologic link. Since children are easily distracted, it is helpful to have them point and slide finger under letter or trace the letter as they say the sound. You can teach sounds correctly, but if the student is not actually looking at print while saying/hearing phonologically processing the sound they will fail to build the necessary skill. It is critical to make sure the student is actually looking at the print while saying the sound.
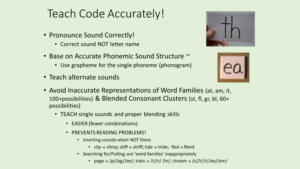
3) Make sure instruction of the printed code =sound is phonemically accurate. Base instruction of printed code on correct grapheme=single phonemes.
For the printed code, use the correct accurate grapheme (phonogram) that represents single sounds (phonemes). The print is the accurate written grapheme (letter or letters that represent the single sound/phoneme). Don’t use word families and blended consonants that are not phonetically accurate.
For accurate sound (phonemes), teach correct pronunciation. This is the correct sound (phoneme) used in speech and reading. This is not the letter names. For example for the letter ‘t’ , the sound is the quick /t/ not the letter name /tee/. Also, some of the letters have more than one sound. For example, the letter ‘s’ has the sound /s/ and /z/.
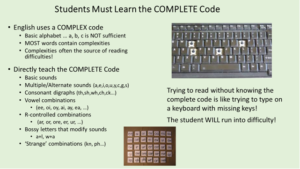
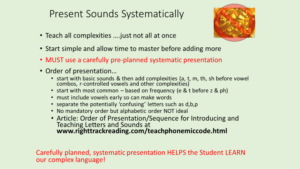
4) Introduce and teach the complete phonemic code systematically. Use a pre-planned organized system sequenced simple to complex. Start with the basic code but also directly teach the complete code including digraphs, vowel combinations, r-controlled vowels and other complexities. For details, see the article Phonemic Code Explained and the article Effective Order of Presentation for Teaching the Phonemic Code
5) Practice until automatic. Practice, practice, practice! Have students practice print to sound (print=sound) knowledge in isolation with a variety of direct instruction activities until this knowledge is automatic. After automatic knowledge is acquired, the grapheme(phonogram) & sound no longer needs to be practiced in isolation.
Effective Multisensory Activities for Children and Students to Learn the Specific direct Print to Sound Phonemic Code
- In all these activities, apply the points listed above to explicitly teach the child or student the phonemic code. Show the correct printed letter(s) (accurate grapheme/phonogram) and tell the student the correct pronunciation and then have the student practice this print to sound (print=sound) relationship until it is automatic. These multisensory activities can be performed with individual children, with small groups and with classrooms of students.
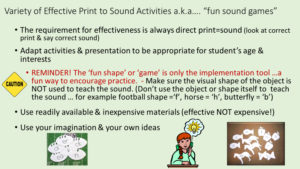
- Effective multisensory activities to learn the phonemic code can occur using a straightforward approach (printed index cards, whiteboard, writing sound) or can be conducted with a wide variety of ‘fun’ games. The only requirements are to directly link correct print to the sound(s), have the student look at the printed letter(s) when saying the sound, and to have the student practice until the sound is automatic.
- Use and modify activities to be age and level appropriate. For example, ‘fun games’ with a kindergarten child and straightforward index cards and writing the sounds with a 5th grade intervention student.
- All these highly effective activities only require commonly available materials and can easily be made at home or in the classroom at no or minimal cost. No need to purchase expensive materials. One of Right Track Reading’s goals is “effective not expensive”.
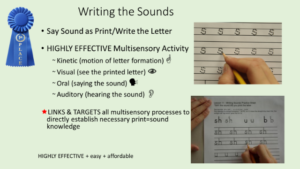
- These simple direct print-to-sound multisensory activities link and apply visual (look at the printed letter(s)), oral (say the sound), and auditory (hear the sound) processes to develop necessary print=sound knowledge. Some of the activities also apply kinetic (physical motion) to improve learning.
The ‘blue ribbon’ grand prize winner for effective multisensory activities to teach & learn the accurate print to sound (print=sound) knowledge of the phonemic code is “Sound Writing”!
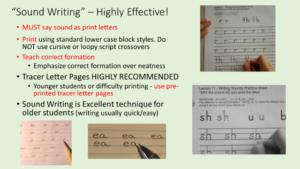
“Sound Writing” or “Write & Say the Sounds”: In this highly effective multisensory activity, the student prints the letter(s) while saying the correct sound. This simple multisensory method is highly effective in helping students learn the ‘printed letter=sound’ relationship. The act of printing the letter when saying the sound directly links the kinetic motion of forming the letter, visual image of the completed letter, oral process of saying the sound, and auditory process of hearing the correct sound. As a result, the act of printing the letter(s) while saying the correct sound is one of the most effective tools for developing automatic print=sound knowledge. If a student does not automatically know a sound, have them repeatedly print the letter(s) as they say the sound. Not only is ’sound writing’ highly effective, it is extremely efficient from both time and cost standpoints. Sound writing can be conducted as a class, group or individually.
A few points to consider with ‘sound writing’ activities include:
- Make sure the child is SAYING the sound as they print (or trace) the letter.
- Always use lower case standard manuscript print.
- Correct formation of the letters is important.
- Tracer letters are highly recommended for young students who are learning to print/still developing handwriting skills and for students with handwriting challenges. Tracer letters are a fantastic tool! It is better to have a student trace correctly than to ‘write’ letters incorrectly on their own. Tracer letters allow the student to see the actual correct letter/grapheme. Tracker letters also help children learn correct formation. (see free resources for users of Right Track Reading Lessons for sample set of tracer letter pages)
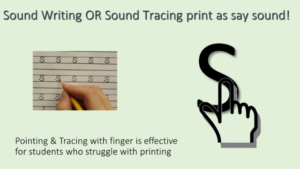
- If a young student is still developing fine motor skills and others face difficulty writing, you can achieve same multisensory effectiveness by having the student trace a large printed letter with their finger instead of writing the letter themselves (student traces the formation lines of the letter with his/her finger). The key is to get the kinetic motion of the letter formation while saying the sound.
- Sound writing (print/say sound) is a useful tool for older students. Since the handwriting itself is typically not a learning process, older students can quickly print/say their sounds. Older students who print proficiently can use standard lined paper or personal whiteboards for ‘sound writing’.
Other Effective multisensory activities for direct print to sound (print=sound) instruction and practice include:
Flash card practice: You can make a set of simple flash cards with the letter(s) written on an index card. Make sure child points at letter when saying the sound. While not as flashy as other ‘games’, this drill is efficient and young children can still ‘show off’ how many sounds they know! This straightforward practice is also appropriate for older students.

Flash cards of various shapes: You can also make flash cards out of shapes that are more appealing to younger students. I have a stack of blank cutouts of various shapes (footballs, butterflies, trucks, cats) that I used for some of my younger tutoring students (k-1st graders). For example, the one little boy loved sound practice with ‘his football cards”. Nothing fancy, straightforward drill of print to sound (print=sound). Only, difference is instead of using index card rectangles, I write the sound on the paper or cardstock cut out fun shapes. (Some elementary schools already have the die-cut machines that quickly cut out fun shapes with construction paper or cardstock.)

Fun ‘Sound Games’ ~ These variations on straightforward flash card practice use cards cut into various shapes to create fun games (the more the student practices the sooner they learn sound and move on to higher level skills. This fun games encourage practice and drill.
“Fishing for Sounds”: Cut out index cards or cardstock in the shape of fish. Write the letter(s) on the fish. Your child ‘catches’ the fish. If they know the sound they can keep the fish. See how many fish they can catch. You can even make a ‘fishing pole’ with a stick, string and paper clip or small clothespin. (My youngest daughter was a hard-core fisherman, so this was her favorite!)

“Catching Sound Butterflies”: Cut out the index cards or cardstock in the shape of butterflies. Write the letter(s) on the ‘butterflies’. Give your child a small goldfish net and let them ‘catch’ the sound butterflies. They can keep the ‘sound butterflies’ that they know!

“Collecting Sound Cars”: Cut out the index cards or cardstock in the shape of cars. Write the letter(s) on the cars. The child collects the sound cars when he says the correct sound!
“Herding Sound Horses”: You guessed it! Cut out the index cards in the shape of horses. The child sees how big of a horse herd she can round up. All she needs to do to herd a horse is to say the sound correctly! She can even collect her herd in a her ‘corral’ or ‘barn’.

“Have a Ball with Sounds”: Cut out cards in the shape of your child’s favorite sport. Write sounds on round basketballs. See how many sounds they can ‘dunk’ into a ‘basket’ (of course they have to say the sound correctly to score! If they like soccer, just write sounds on ‘soccer balls’ and have them say the sound to ‘kick the sound’ into the net and score.

“Go Fishing Card Game”. Write the sounds on the cards. Have the child ask “do you have an /__/” (say the sound). For example, “Do you have an /s/?” No, go fish! Yes, hand it over!
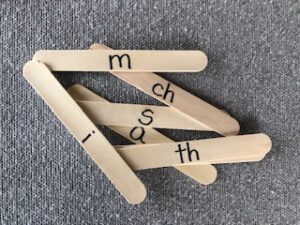
“Pick up Sound Sticks” – write the sounds on popsicle craft sticks and play the old ‘pick up sticks’ game, except when the child picks up the stick, they have to say the correct sound as they try and collect all the sticks.
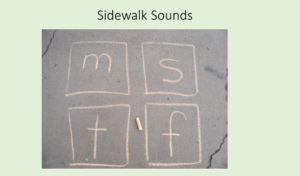
Outdoor Activities such as ‘sound hopscotch’ or ‘sound dribbling drills’ – You can even go outside and play! All you need is an energetic child and some sidewalk chalk! Write the sounds in hopscotch type squares and have child say the sound as they jump on a square. Write the sounds in squares across a basketball court and the child can dribble the ball on the sounds as they call out the sound. Once again, the key to effectiveness in building necessary skill, is looking at the print while saying the sound. Sidewalk chalk is a great tool for energetic children. They don’t have to sit still to learn their sounds!
Multisensory Activities with ‘Sound Tiles’: Sound tiles are another highly effective tool for practicing sounds. Simply write the sounds on the square tiles and use these tiles for various multisensory activities. I use 2” bathroom tiles (fantastic size, weight and durability and tactile feel). You can also make ‘sound tiles’ from thick cardstock, foam board or plastic squares.
Direct practice with the sound tiles: You can use the tiles as you would use flash cards. The student points at the printed letter(s) and says the sound. You can also use the tiles for a variety of fun games:
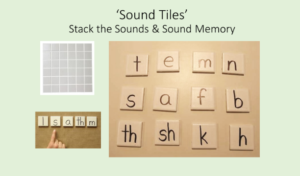
“Stack the sounds”: Turn the tiles over. Have the child pick a tile up. When the child knows the sound, he can keep the tile. See how high he can build his stack.
“Sound Memory”: play the traditional memory game except the child needs to match sounds. Set out 2 tiles for each sound, turn over and mix the tiles up. Every time he turns over a tile, he must say the sound. When he locates the matching sounds, he can keep the set.
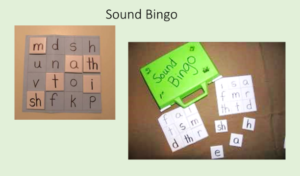
“Sound Bingo” : Make bingo cards with 3×3 or 4×4 grids with the letter(s) your child needs to practice written on the squares. Then call out the sounds (not letter names). For example, do you have /s/, do you have /m/, do you have /th/..etc. Use the ‘sound tiles’ or make ‘bingo chips’ with the letters printed on them. The child must find and match the correct ‘sound tile’ or bingo chip to the correct bingo square. AND of course, the child must always say the correct sound!
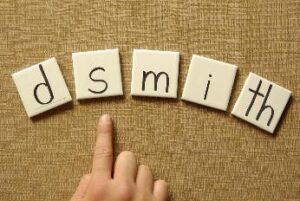
Activities Linking Phonemic Awareness to Print – Direct sound to print practice: This can be done with children first developing phonemic awareness to both practice the print to sound relationship (print=sound) and to develop necessary phonemic awareness. For additional information on developing phonemic awareness see article Phonemic Awareness Explained. Have the student listen to a sound and then identify/point to the appropriate printed representation. In this way the student practices the phonemic code in reverse, sound to print. These sound to print activities can be conducted with many of the phonemic awareness activities listed in the article Activities to Directly Develop Phonemic Awareness Many variations of sound to print activities exist. Sound tiles or index cards can be used to conduct these activities. These activities directly build phonemic awareness, link phonemic awareness to print and also build automatic knowledge of the printed code. These sound identification activities only require the child to point at the letter when they hear the sound so can be used for children who have not yet learned to print.
“What Sound Is It?” – Sound Identification Activities: Say a word that starts with one of the sounds. The child identifies the beginning sound and then points to the correct letter that starts the word. (For example, lay out the tiles for ‘m’, ‘s’, ‘i’, and ‘th’. Tell the child a word like ‘sit’. The child then recognizes the beginning /s/ sound and points to the ‘s’ tile. You then say the word ‘mom’ and the child says /m/ and points to the ‘m’ tile.
…. and MORE effective multisensory activities & fun sound games you can use with your child or student to develop direct print to sound phonemic code knowledge
As you can see from these examples, teaching with carefully targeted direct instruction multisensory activities absolutely can be fun. Direct practice and drill with the printed letter(s) = sound can be accomplished with a variety of fun age-appropriate games. Use your imagination and come up with variations that your child enjoys. If he likes basketball, write the sounds on paper ‘basketballs’ and let him ‘dunk’ the sounds he says correctly. If she likes to go hunting with her grandpa, make a bunch of “sound deer”. If he loves playing with Legos, tape the sounds he needs to practice on Lego blocks for a sound game. As long at the child is directly looking at the accurate printed letter(s) AND saying the correct sound the activity effectively teaches your child the necessary print to sound (print=sound) relationship. The child needs to repeatedly practice sounds to learn them automatically. You can easily make the practice and drill enjoyable for the child. Remember as soon as sounds are automatic, you no longer need to practice them in isolation.
Notes & Suggestions for Adapting Activities to Classroom Environment:
The direct print=sound activities to teach the phonemic code listed above are effective with individual students, small groups and classrooms. However, classroom teachers often need to modify presentation of these activities for classroom environment. These are a few suggestions and examples for altering presentation for a classroom application:
- When directly teaching new sounds by showing the print and saying the correct sound teachers need larger formats that can be seen across the room. Teachers can use large posterboards, overheads, smartboards or whiteboard/chalkboard for classroom instruction.
- Importantly, make sure the student is actually looking at the printed letter and saying the sound! This can be challenging in classroom setting, especially with young energetic students that are easily distracted. For example, I evaluated a young and highly distractible kindergartener. He had been in class for over 6 months and did not yet know ANY of his basic sounds. While the teacher had taught the class the sounds, this little boy had not learned as he was most likely looking out the window, distracted by his buddy or preplanning his recess adventures. To get him to look at and focus on the print, it was essential to require him to actually trace the letters with his fingers and ‘write the sound’ with tracer letters. With this, he quickly gained knowledge of the sounds. That is why sound writing and sound tracing is so effective! It forces the student to actually ‘look at print’ and ‘say sounds’.
- In a classroom situation, the phonics phones are an effective tool for enhancing the print to sound instruction. The phonics phones simply focus the student on listening to the sound and help establish the essential phonologic processing link. For more information see the article Phonics Phones Explained.
- “Sound writing”: This is one of most effective tools for classroom instruction and can be used with individuals, small groups and entire classrooms. By design, the student must be looking at print as they write and say the sound! Teachers should definitely use pre-printed tracer letter pages for younger students and coordinate these sound practice pages with the direct systematic phonics program. At the beginning level, the sound practice can be conducted in conjunction with handwriting instruction. Just have the students say the sound as they print the letter.
- “Say the Sounds”: To introduce a sound to a group or the class, the teacher selects and holds up a specific printed sound on a large poster board or points to the printed sound on a smartboard or whiteboard. The teacher demonstrates the correct sound. As the teacher points to the grapheme/letter(s) and the students look at the print and repeatedly say the sound correctly into the phones. Sounds can be practiced as a group or class with the teacher pointing to printed letters on smartboard, whiteboard or large poster board.
- “Drill & Practice with Sound Cards”: After sounds are introduced the students need to practice sounds until they become automatic. Index cards are ideal for individual practice. For older students, this straightforward drill of print-to-sound is also more appropriate. The students can go through their individual stack of sounds (index cards) and practice saying the sound into their phones, the teacher can walk around the class listening to individual children and make needed corrections. (5 min/day of direct practice on sounds). When the student has acquired automatic knowledge of a sound, rotate these ‘automatic’ sounds out of the practice stack and replace with new sounds until knowledge of the entire code is automatic.
- “Sound Exit Pass”: This is just another version of direct print to sound (print=sound) practice. You can add practice quickly with individual students when they file out for recess or line up for lunch. You flash a card and they tell you the sound to pass through the door.
- “Sound Games”: Teaches can easily use a variety of fun sound games including ‘sound bingo’, ‘stack the sound’, ‘fishing for sounds’, ‘herding sound horses’ & ‘catching sound butterflies’. Some games such as ‘sound bingo’ would be effective as a classroom activity. Others are effective in smaller groups (ideal for centers!). These ‘sound games’ also make excellent homework activities. For example, send home a ziplock baggie with paper ‘sound fish’ for the child to play ‘fishing for sounds’.
Knowledge of the Complete Phonemic Code is only one skill needed for proficient reading:
Knowledge of the phonetic code (print=sound) is absolutely necessary for proficient reading. To learn details about this essential skill, see the article “Building Blocks of Written English: The Phonemic Code Explained”.
However, isolated knowledge of the phonetic code is not sufficient for reading. Reading is complex and requires mastering and integrating many different essential skills. For a visual representation outlining necessary skills and integration of skills for correct phonologic processing of print and development of proficient reading See Overview and Visual Representation of Overall Processes Required for Proficient Reading For additional details on the multiple skills needed for proficient reading, see the article Skills Necessary for Proficient Reading: Explanation of Foundational Skills for Phonologic Processing and Higher-Level Skills to Advance to Proficient Reading
While knowledge of the basic sounds is an essential start, an effective complete direct systematic phonics program is still necessary to ensure your child acquires proficient reader skills. To learn how to effectively teach your child or student to read, see the article Direct Systematic Phonics Instruction Proven Effective – Why Parents & Teachers Should Use Direct Systematic Phonics
Empowering parents & teachers with information & effective resources to lead their student to reading success!
Reading is complex and requires mastering and integrating many different essential skills. For additional free information, useful articles and effective resources on teaching students to read CLICK TO EXPLORE FREE READING INFORMATION
If you are ready to learn more about the effective tools to help your child or student achieve reading success, CLICK TO PREVIEW EFFECTIVE RIGHT TRACK READING PROGRAMS.
————————————————————————————-
This information was written by Miscese Gagen, a mother with a passion for teaching children to read proficiently by using effective methods. She is the author of the effective reading instructional programs Right Track Reading Lessons and Back on the Right Track Reading Lessons as well as a reading tutor with over 20 years’ experience successfully building proficient reading skills in her students. The purpose of this article is to empower parents and teachers with information to help their children achieve reading success. We CAN improve reading proficiency, one student at a time! More information located at www.righttrackreading.com ~ Copyright 2004-2021 Miscese R. Gagen